FHB Logo Facebook LinkedIn Email Pinterest Twitter X Instagram Tiktok YouTube Plus Icon Close Icon Navigation Search Icon Navigation Search Icon Arrow Down Icon Video Guide Icon Article Guide Icon Modal Close Icon Guide Search Icon Skip to content
Subscribe
Log In
  • How-To
  • Design
  • Tools & Materials
  • Restoration
  • Videos
  • Blogs
  • Forum
  • Magazine
  • Members
  • FHB House
  • Podcast
Log In

Fine Homebuilding Project Guides

Drywall

Guide Home
  • Drywall Basics
  • Tools and Materials
  • Hanging Drywall
  • Taping and Sanding
  • Special Installations
  • Drywall Repairs
  • Plaster
Tools & Materials

Joint Compound

The choice is between drying-type and setting-type compounds.

By Myron R. Ferguson
Pick your compound: A wide range of joint compounds is available in both dry and premixed forms. Always match the compound to the job at hand.

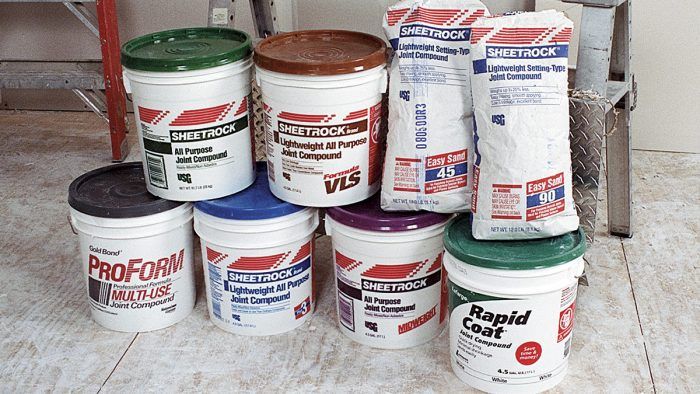
There are so many types and brands of joint compound that it can be difficult to know which ones to use. The most important distinction is between drying-type compounds and setting-type compounds. Here, I’ll describe some of the most popular types within each of these categories.

Drying-type joint compound Drying-type joint compound is the type most commonly used. Available in both premixed and dry (powdered) forms, drying-type joint compound makes up the bulk of what you see in buckets and boxes at your local hardware store.

Most drying-type compounds are vinyl-based and dry as the water evaporates. They require an application temperature of at least 55°F (this includes air, surface, and compound temperatures). The compound must dry thoroughly between coats, and the drying time is greatly affected by temperature, humidity, and airflow. (Under good conditions, drying-type compounds dry within 24 hours.)

Premixed drying-type joint compound comes in 1-gal. and 5-gal. buckets and boxes. The 1-gal. size is good for patching small jobs; the 5-gal. bucket is enough to tape an average 12-ft. by 12-ft. room.

Using the premixed compounds offers a few advantages:

  • It is ready to use right out of the bucket.
  • The consistency of the mix is factory controlled, and most brands are equal in quality.
  • There is little waste with premixed compound—the bucket can be resealed and used again later.

There are a few cautions to remember when using premixed compounds. First, the fresher the better. To preserve freshness, keep buckets out of direct sunlight and don’t allow the compound to freeze. Also remember, premixed compound will not keep indefinitely—especially after it has been opened; at room temperature, a previously open bucket of compound will start to go bad in about a month.


Choosing the Right Joint Compound

When deciding which type of joint compound to use, consider the following factors:

  • The size of the job (for a small job, it is less convenient to use two or three types of compound).
  • The drying and heating conditions (temperature, airflow, and humidity).
  • The availability of materials, including water, at the job site. Taping compound and some of the fast-drying setting-type compounds are available only at larger drywall-supply stores.
  • The amount of time you have to complete the job (use setting-type compounds if time is short).
  • The recommended combination of products (for example, most mesh tapes should be embedded in a taping compound or in a setting-type compound).
  • Personal preferences (such as the convenience of the premixed drying type versus the strength and better bonding of the setting type).


WORK SMART: Be aware that the setting time of joint compound can be adversely affected by overmixing or undermixing, mixing a compound that has been in the sun or cold, and using dirty water (and equipment) or water that is too warm or cold.


Powdered drying-type joint compound has all the same working characteristics as the premixed compound. The major difference is that it comes in dry form and must be mixed with water. A compound in dry form can be stored and transported at any temperature (though it should always be brought to room temperature before mixing). Once mixed the compound is treated and stored just like the premixed compound.

WORK SMART: Regardless of the type of compound you use on the first two coats, use a drying-type compound for the final coat—it’s easier to work with and sand.


I use three kinds of drying-type joint compound on a regular basis (each is available premixed or dry):

  • Taping compound is used to embed the joint tape for the first coat and as filler for the second coat. It is a strong compound, has little shrinkage as it dries, and has excellent bonding and resistance to cracking.
  • Topping compound is used for a thin finishing coat. It is easy to work with, feathers out nicely, dries quickly, and sands smooth. Topping compound can be used over taping compound or over all-purpose joint compound.
  • All-purpose compound can be used for all stages of the taping process—to embed the tape—as a filler coat—and as a finish coat. Because it’s more convenient to deal with just one type, all-purpose compound is the most commonly used compound. However, it doesn’t have the same strength, bonding qualities, or stability as the taping and topping combination.


Approximate Coverage of Materials

Screws and Nails
The number of fasteners used to attach drywall depends on framing spacing, fastener spacing, panel length, and panel orientation. For rough estimating, I usually figure around 1,000 fasteners per 1,000 sq. ft. of drywall.

Joint Tape
It usually takes about 370 linear ft. of joint tape to finish1,000 sq. ft. of drywall.

Joint Compound
The amounts figured here are estimates for a complete taping job (three coats):

  • Premixed drying-type joint compound: 11 gal. per 1,000 sq. ft. of drywall.
  • Powdered drying-type compound: 80 lb. mixed with water per 1,000 sq. ft. of drywall. (Powdered compound is usually sold in 25-lb. bags.)
  • Setting-type joint compounds vary in weight by types. A rough guide is to figure about 3 bags of setting compound per 1,000 sq. ft. of drywall.


Setting-type joint compounds Whereas drying-type compounds are vinyl-based and dry as the water evaporates, setting-type compounds harden by chemical reaction. The great advantage of setting-type compounds, which are only available in powdered form, is that they harden faster than drying-type compounds. Unlike drying-type compounds, setting-type compounds actually harden before the joint is completely dry. When first mixed, setting compound is smooth and as easy to use as drying compound.

Setting times vary from 20 minutes to 6 hours, depending on the type used. I prefer a product that sets in 3 to 4 hours, which gives me enough time to apply the compound to the seams. I know that it will be ready for another coat of compound by the next day, even in humid or cool conditions (air, surface, and compound temperatures can be as low as 45°F). Furthermore, setting compound can be given a second and third coat as soon as it sets up—you don’t have to wait until it is completely dry. Other benefits include better bonding qualities, less shrinkage and cracking, and a harder finish.

Given that setting-type compounds have so many advantages, you may wonder why anyone would use anything else. But there is a downside: The stuff is much harder to sand, which means that you have to get it as smooth as possible while taping. (However, there is a lightweight setting-type compound that is easier to sand than the stronger, standard type.) Also, you should mix only as much compound as you can use before it sets up. Unlike powdered drying-type compound, it cannot be stored and reused at a later date.

When using fiberglass-mesh tape or when I am trying to get a little ahead on a job, I like to use a setting-type compound to embed the tape (first coat). I’ll often use the same type of compound for the second fill coat making sure to take the time to get the compound as smooth as possible. For the third and final coat, I use a drying-type compound, either an all-purpose compound or a topping compound.
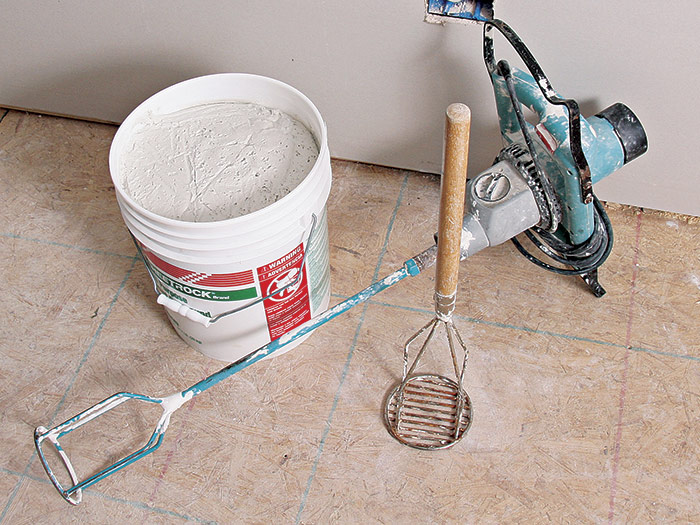
Mix the compound
Mix the compound: Even ready-made joint compound needs to be mixed before you use it. You can use a powered mixing paddle or a hand mixer.

Mixing tools

Joint compound can be mixed with a powered paddle or by hand. For thorough mixing and textured finishes, use a mixing paddle with a heavy-duty electric drill. You can use a hand mixer for ready-mixed compounds that have sat too long or have been thinned with water for easier application.


Sign up for eletters today and get the latest how-to from Fine Homebuilding, plus special offers.

Signing you up...

This site is protected by reCAPTCHA and the Google Privacy Policy and Terms of Service apply.
See all newsletters
See all newsletters
Previous: What’s the Difference: Paper and Fiberglass Mesh Drywall Tape Next: How to Choose and Mix Setting Type Joint Compound

Guide

Drywall

Chapter

Tools and Materials

Log in or create an account to post a comment.

Sign up Log in

Become a member and get full access to FineHomebuilding.com

Drywall

Drywall

Trusted, comprehensive guidance for choosing, hanging, taping, sanding, and repairing drywall—the right way

View Project Guide

View All Project Guides »

Become a member and get unlimited site access, including the Drywall Project Guide.

Start Free Trial

Drywall Basics
  • Types and Uses of Drywall
  • Planning the Job
Tools and Materials
  • Hanging Tools
  • Taping Tools and Materials
  • Sanding and Finishing Tools and Materials
Hanging Drywall
  • Prep for Hanging
  • Measuring and Cutting Drywall
  • Guidelines for Hanging and Fastening Drywall
  • Hanging Ceilings
  • Hanging Walls
  • Hanging Airtight Drywall
  • Trim Accessories/Corner Beads
Taping and Sanding
  • Taping Basics
  • Taping Seams
  • Taping Inside and Outside Corners
  • Sanding
Special Installations
  • Tricky Transitions
  • Curved Surfaces
  • Other Special Installations
  • Decorating with Drywall
Drywall Repairs
  • Patching Holes, Cracks, and More
Plaster
  • Working with Lime Plaster
  • Plaster Repair
  • Classic Plaster Techniques

Fine Home Building

Newsletter Sign-up

  • Fine Homebuilding

    Home building tips, offers, and expert advice in your inbox.

  • Green Building Advisor

    Building science and energy efficiency advice, plus special offers, in your inbox.

  • Old House Journal

    Repair, renovation, and restoration tips, plus special offers, in your inbox.

Signing you up...

This site is protected by reCAPTCHA and the Google Privacy Policy and Terms of Service apply.
See all newsletters

Follow

  • Fine Homebuilding

    Dig into cutting-edge approaches and decades of proven solutions with total access to our experts and tradespeople.

    Start Free Trial Now
    • Facebook
    • Instagram
    • X
    • LinkedIn
  • GBA Prime

    Get instant access to the latest developments in green building, research, and reports from the field.

    Start Free Trial Now
    • Facebook
    • YouTube
  • Old House Journal

    Learn how to restore, repair, update, and decorate your home.

    Subscribe Now
    • Facebook
    • Instagram
    • X

Membership & Magazine

  • Online Archive
  • Start Free Trial
  • Magazine Subscription
  • Magazine Renewal
  • Gift a Subscription
  • Customer Support
  • Privacy Preferences
  • About
  • Contact
  • Advertise
  • Careers
  • Terms of Use
  • Site Map
  • Do not sell or share my information
  • Privacy Policy
  • Accessibility
  • California Privacy Rights

© 2025 Active Interest Media. All rights reserved.

Fine Homebuilding receives a commission for items purchased through links on this site, including Amazon Associates and other affiliate advertising programs.

X
X
This is a dialog window which overlays the main content of the page. The modal window is a 'site map' of the most critical areas of the site. Pressing the Escape (ESC) button will close the modal and bring you back to where you were on the page.

Main Menu

  • How-To
  • Design
  • Tools & Materials
  • Video
  • Blogs
  • Forum
  • Project Guides
  • Reader Projects
  • Magazine
  • Members
  • FHB House

Podcasts

  • FHB Podcast
  • ProTalk

Webinars

  • Upcoming and On-Demand

Podcasts

  • FHB Podcast
  • ProTalk

Webinars

  • Upcoming and On-Demand

Popular Topics

  • Kitchens
  • Business
  • Bedrooms
  • Roofs
  • Architecture and Design
  • Green Building
  • Decks
  • Framing
  • Safety
  • Remodeling
  • Bathrooms
  • Windows
  • Tilework
  • Ceilings
  • HVAC

Magazine

  • Current Issue
  • Past Issues
  • Magazine Index
  • Subscribe
  • Online Archive
  • Author Guidelines

All Access

  • Member Home
  • Start Free Trial
  • Gift Membership

Online Learning

  • Courses
  • Project Guides
  • Reader Projects
  • Podcast

More

  • FHB Ambassadors
  • FHB House
  • Customer Support

Account

  • Log In
  • Join

Newsletter

Get home building tips, offers, and expert advice in your inbox

Signing you up...

This site is protected by reCAPTCHA and the Google Privacy Policy and Terms of Service apply.
See all newsletters
See all newsletters

Follow

  • X
  • YouTube
  • instagram
  • facebook
  • pinterest
  • Tiktok

Join All Access

Become a member and get instant access to thousands of videos, how-tos, tool reviews, and design features.

Start Your Free Trial

Subscribe

FHB Magazine

Start your subscription today and save up to 70%

Subscribe

We hope you’ve enjoyed your free articles. To keep reading, become a member today.

Get complete site access to expert advice, how-to videos, Code Check, and more, plus the print magazine.

Start your FREE trial

Already a member? Log in