FHB Logo Facebook LinkedIn Email Pinterest Twitter X Instagram Tiktok YouTube Plus Icon Close Icon Navigation Search Icon Navigation Search Icon Arrow Down Icon Video Guide Icon Article Guide Icon Modal Close Icon Guide Search Icon Skip to content
Subscribe
Log In
  • How-To
  • Design
  • Tools & Materials
  • Restoration
  • Videos
  • Blogs
  • Forum
  • Magazine
  • Members
  • FHB House
  • Podcast
Log In
How-To

Pick and Prepare Joint Compound

Learn how to choose and prepare joint compound

By Patrick McCombe Issue 226

Contrary to what most people think, ready-mix joint compound is not ready to use straight from the bucket. It needs to be mixed for the compound to spread evenly, which leads to a professional-looking finishing job with less sanding.

Ready-mix compounds are available in several versions. At home centers, you’ll find regular and lightweight all-purpose compounds. At drywall-supply stores, you may also see taping, topping, and ultralight compounds. I’ve found that regular-weight all-purpose compound works fine for most drywall-finishing projects. Lightweight all-purpose compound is a good option when you have to carry a lot of compound far from the truck, but it’s softer when dry, which makes it susceptible to damage. Lightweight compound sands more easily than regular compound, however, so if you’re new to finishing, it’s worth a try.

Powdered setting compound, which is mixed with water before use, hardens chemically, making it a better choice for patching holes, for thick applications, and for the tape coat. It is also stronger and doesn’t break down with exposure to water, making it good for bathrooms and other wet areas. Don’t, however, dump it down the drain when cleaning up.

Most lumberyards and home centers have setting-type compounds with 45- and 90-minute set times, but drywall suppliers often have compounds available with set times from 5 to 210 minutes. The number on the bag is the average time that it takes for the compound to firm up enough to apply another coat. This time can vary with temperature and humidity.

Preparing both ready-mix and setting-type compound is an important first step in becoming proficient at drywall finishing.

Step by Step: Preparing ready-mix compound

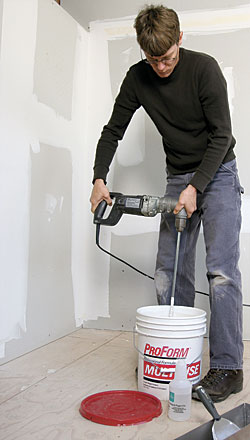
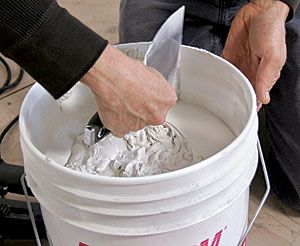
Step 1 Pop the top. A new bucket of joint compound may look mixed, it may look dry, or it may have a little water on top. In any case, start mixing the compound with a mud masher or a drywall mixing paddle in a 1⁄2-in., low-speed (450-650 rpm) drill. You’ll soon notice that the compound has fluffed up and feels softer.

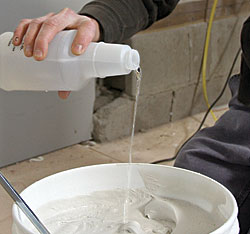
Step 2 Add a few ounces of water. You can use joint compound at the packaged consistency for filling corner bead and fastener heads, but you should add a few ounces of cool water and remix to make applying tape and second and third coats easier.

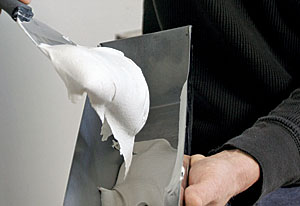
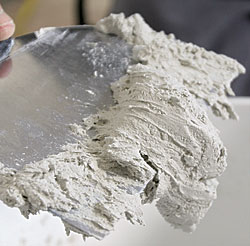
Step 3 The right mix. Thinned compound should be the consistency of soft butter. Don’t add too much water, because soupy compound is messy and difficult to work with.

Store for later use

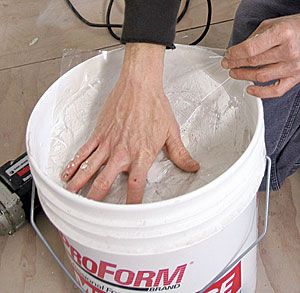
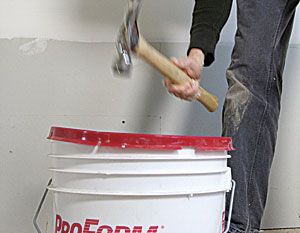
Scrape down the sides of the bucket, and level the compound before covering it with a wet rag, a thin layer of water, or the clear plastic wrap that came on the compound to prevent it from drying out. Return the lid to the bucket, and seat it all the way around with a series of hammer blows.

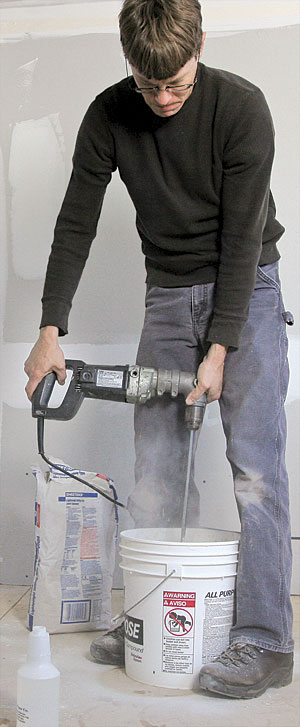
Step by Step: Prepare setting-type joint compound

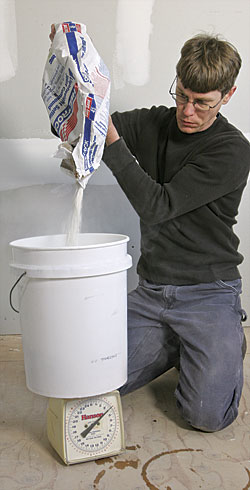
Step 1 Weigh it out. A bathroom or kitchen scale is more accurate than eyeballing when you’re mixing a partial bag for a small job or when you can’t use a full bag within the working time specified in the directions. Zero the scale with the empty bucket on top, and weigh out the desired amount

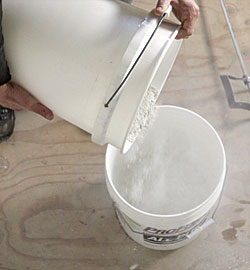
Step 2 Add powder to water. Following the mixing instructions on the bag, pour the proper amount of water in a second bucket. If you’re mixing a partial bag, maintain the same ratio of water to powder specified for a full bag in the directions. Shake in the powder, then mix. Go slowly at first to minimize flying powder.

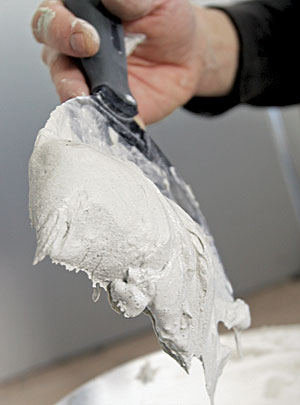
Step 3 Mix, then wait. Mix the compound thoroughly, and then let it rest for the time specified on the bag, usually 10 minutes. If necessary, add a little water, and remix to get to the proper working consistency. Too much or high-speed mixing will accelerate set times. The compound shown at left is the perfect consistency.

Throw out overly stiff compound

When the compound starts to get a little hard to spread, switch to corner bead or other areas that use a lot of compound quickly. Don’t try to rescue any hardened compound with additional water. Instead, start over with a new batch.

What to buy

These paddles and compounds will help the job to go smoothly.

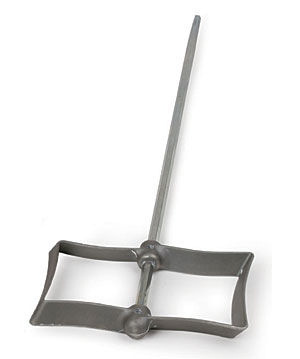
Drill-powered mixing paddle, $18Dan Thorton 
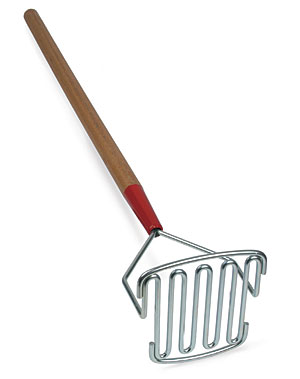
Manual mud mixer, $18Dan Thorton

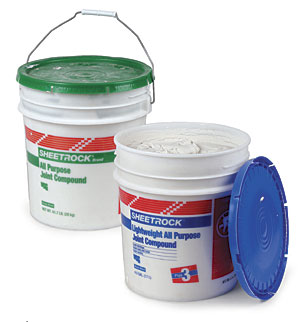
All-purpose joint compound, $15; Lightweight all-purpose joint compound, $15Dan Thorton 
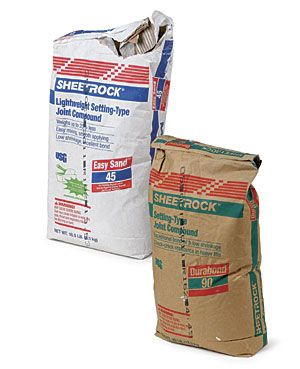
Easy Sand 45 setting-type joint compound, $12; Durabond 90 setting-type joint compound, $12Dan Thorton

Online Video Extra:  How to Choose and Mix Ready Mix Joint Compound

Photos: Rob Yagid, except where noted.

Sign up for eletters today and get the latest how-to from Fine Homebuilding, plus special offers.

Signing you up...

This site is protected by reCAPTCHA and the Google Privacy Policy and Terms of Service apply.
See all newsletters
See all newsletters
×

Get home building tips, offers, and expert advice in your inbox

Signing you up...

This site is protected by reCAPTCHA and the Google Privacy Policy and Terms of Service apply.
See all newsletters
See all newsletters

New Feature

Fine Homebuilding Forums

Ask questions, offer advice, and share your work

Log in or create an account to post a comment.

Sign up Log in

Become a member and get full access to FineHomebuilding.com

Up Next

Video Shorts

Featured Story

The Trump Administration Wants to Eliminate the Energy Star Program

The end of this program will likely lead to higher energy bills and fewer business opportunities for the American people.

Featured Video

Builder’s Advocate: An Interview With Viewrail

Learn more about affordable, modern floating stairs, from design to manufacturing to installation.

Related Stories

  • Seven Ways to Remove Paint
  • A New Approach for Millwork Finishes
  • Prevent Paint Bridging With Picks
  • 10 Tips for a Long-Lasting Paint Job

Discussion Forum

Recent Posts and Replies

  • |
  • |
  • |
  • |
  • |
  • |
View More Create Post

Highlights

Fine Homebuilding All Access
Fine Homebuilding Podcast
Tool Tech
Plus, get an extra 20% off with code GIFT20

"I have learned so much thanks to the searchable articles on the FHB website. I can confidently say that I expect to be a life-long subscriber." - M.K.

Get home building tips, offers, and expert advice in your inbox

Signing you up...

This site is protected by reCAPTCHA and the Google Privacy Policy and Terms of Service apply.
See all newsletters
See all newsletters

Video

View All Videos
  • Give Windows and Doors a Durable Finish with Linseed Oil Paint
  • Podcast 598: Members-only Aftershow — Long-Lasting Paint Jobs
  • Podcast 538: PRO TALK With Painting Contractor Luke DiBlasi
  • Podcast 484: PRO TALK With Color Consultant Paula Gaull
View All

Paints and Finishes

View All Paints and Finishes Articles
  • Seven Ways to Remove Paint
  • A New Approach for Millwork Finishes
  • 10 Tips for a Long-Lasting Paint Job
View All Paints and Finishes Articles

Fine Homebuilding Magazine

  • Issue 331 - June 2025
    • A More Resilient Roof
    • Tool Test: You Need a Drywall Sander
    • Ducted vs. Ductless Heat Pumps
  • Issue 330 - April/May 2025
    • Deck Details for Durability
    • FAQs on HPWHs
    • 10 Tips for a Long-Lasting Paint Job
  • Issue 329 - Feb/Mar 2025
    • Smart Foundation for a Small Addition
    • A Kominka Comes West
    • Making Small Kitchens Work
  • Issue 328 - Dec/Jan 2024
    • How a Pro Replaces Columns
    • Passive House 3.0
    • Tool Test: Compact Line Lasers
  • Issue 327 - November 2024
    • Repairing Damaged Walls and Ceilings
    • Plumbing Protection
    • Talking Shop

Fine Home Building

Newsletter Sign-up

  • Fine Homebuilding

    Home building tips, offers, and expert advice in your inbox.

  • Green Building Advisor

    Building science and energy efficiency advice, plus special offers, in your inbox.

  • Old House Journal

    Repair, renovation, and restoration tips, plus special offers, in your inbox.

Signing you up...

This site is protected by reCAPTCHA and the Google Privacy Policy and Terms of Service apply.
See all newsletters

Follow

  • Fine Homebuilding

    Dig into cutting-edge approaches and decades of proven solutions with total access to our experts and tradespeople.

    Start Free Trial Now
    • Facebook
    • Instagram
    • X
    • LinkedIn
  • GBA Prime

    Get instant access to the latest developments in green building, research, and reports from the field.

    Start Free Trial Now
    • Facebook
    • YouTube
  • Old House Journal

    Learn how to restore, repair, update, and decorate your home.

    Subscribe Now
    • Facebook
    • Instagram
    • X

Membership & Magazine

  • Online Archive
  • Start Free Trial
  • Magazine Subscription
  • Magazine Renewal
  • Gift a Subscription
  • Customer Support
  • Privacy Preferences
  • About
  • Contact
  • Advertise
  • Careers
  • Terms of Use
  • Site Map
  • Do not sell or share my information
  • Privacy Policy
  • Accessibility
  • California Privacy Rights

© 2025 Active Interest Media. All rights reserved.

Fine Homebuilding receives a commission for items purchased through links on this site, including Amazon Associates and other affiliate advertising programs.

X
X
This is a dialog window which overlays the main content of the page. The modal window is a 'site map' of the most critical areas of the site. Pressing the Escape (ESC) button will close the modal and bring you back to where you were on the page.

Main Menu

  • How-To
  • Design
  • Tools & Materials
  • Video
  • Blogs
  • Forum
  • Project Guides
  • Reader Projects
  • Magazine
  • Members
  • FHB House

Podcasts

  • FHB Podcast
  • ProTalk

Webinars

  • Upcoming and On-Demand

Podcasts

  • FHB Podcast
  • ProTalk

Webinars

  • Upcoming and On-Demand

Popular Topics

  • Kitchens
  • Business
  • Bedrooms
  • Roofs
  • Architecture and Design
  • Green Building
  • Decks
  • Framing
  • Safety
  • Remodeling
  • Bathrooms
  • Windows
  • Tilework
  • Ceilings
  • HVAC

Magazine

  • Current Issue
  • Past Issues
  • Magazine Index
  • Subscribe
  • Online Archive
  • Author Guidelines

All Access

  • Member Home
  • Start Free Trial
  • Gift Membership

Online Learning

  • Courses
  • Project Guides
  • Reader Projects
  • Podcast

More

  • FHB Ambassadors
  • FHB House
  • Customer Support

Account

  • Log In
  • Join

Newsletter

Get home building tips, offers, and expert advice in your inbox

Signing you up...

This site is protected by reCAPTCHA and the Google Privacy Policy and Terms of Service apply.
See all newsletters
See all newsletters

Follow

  • X
  • YouTube
  • instagram
  • facebook
  • pinterest
  • Tiktok

Join All Access

Become a member and get instant access to thousands of videos, how-tos, tool reviews, and design features.

Start Your Free Trial

Subscribe

FHB Magazine

Start your subscription today and save up to 70%

Subscribe

We hope you’ve enjoyed your free articles. To keep reading, become a member today.

Get complete site access to expert advice, how-to videos, Code Check, and more, plus the print magazine.

Start your FREE trial

Already a member? Log in