A Concrete-Paver Patio from the Bottom Up
Accurate site work and a well-compacted stone base yield an outdoor room that's firm, flat, and attractive.
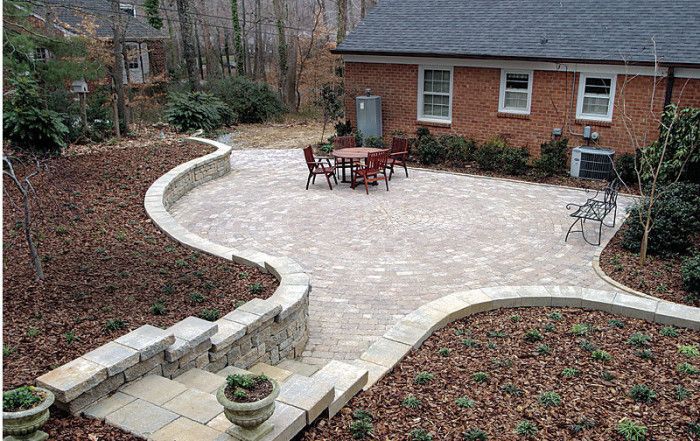
On those first warm days of spring, a patio tucked into a sunny corner of the backyard begs you to spend time outside. Throughout summer and into fall, that versatile outdoor room can be a solitary retreat or a place to entertain guests. Regardless of the season, a flat and firm patio made from simple materials adds value to your home.
Traditionally, patios have been made of brick, flagstone, or poured concrete, but I prefer installing concrete pavers. Pavers are widely available, and you can buy them in different shapes and colors. The cost of a patio made with concrete pavers is roughly twice that of poured concrete and comparable to clay-brick pavers. Site conditions and labor costs vary widely, but here in North Carolina, where I work, the installed cost of a paver patio runs between $10 and $20 per sq. ft. (see “How much will it cost?”). I like the durability of concrete pavers, and their consistent size makes for ease of installation.
When you’re installing a paver patio or walk, it’s what you do before the pavers go down that makes all the difference. If you plan carefully (see “Before you begin”) and prepare a good base, you’ll set the stage for a patio that looks great and will stay that way for a long time.
Before you begin
- Use spray paint to outline the patio on the ground.
- Before excavating, call a local utility or service to locate underground hazards.
- Cover or protect sensitive plants.
- Find a flat, convenient location to unload pavers, stone, sand, etc.
- Do you need to remove soil? If so, decide where it will go.
- Patios change the way water drains around your house. Determine what drainage alterations will be necessary to move water away from the house.
- Plan outdoor-lighting and power locations, and install underground lines as necessary.
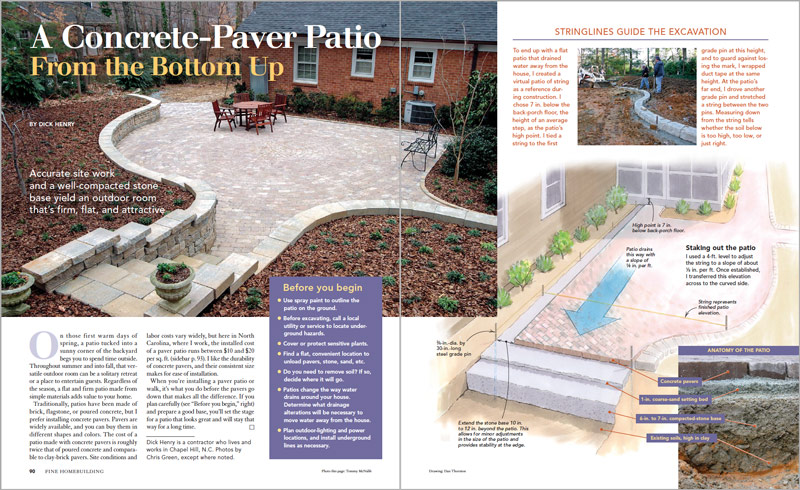
Stringlines guide the excavation
To end up with a flat patio that drained water away from the house, I created a virtual patio of string as a reference during construction. I chose 7 in. below the back-porch floor, the height of an average step, as the patio’s high point. I tied a string to the first grade pin at this height, and to guard against losing the mark, I wrapped duct tape at the same height. At the patio’s far end, I drove another grade pin and stretched a string between the two pins. Measuring down from the string tells whether the soil below is too high, too low, or just right.
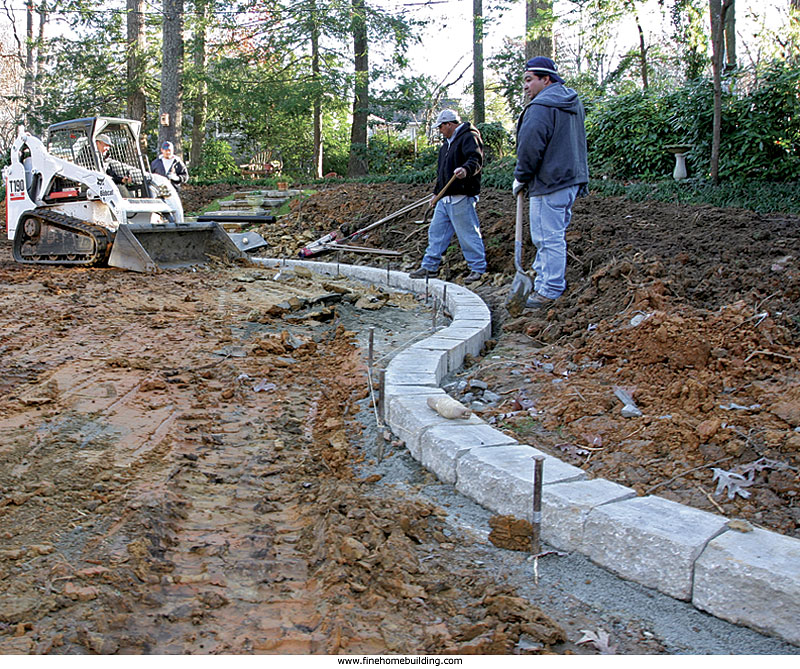
The stone base is critical
For a lasting job, nothing is more important than getting the stone base firm and flat. I excavate the site 9 in. to 10 in. below the finished grade to make room for the stone base. Slope the excavation to promote drainage, following the stringlines. A Bobcat makes quick work of moving stone; a plate compactor packs and flattens the base.

I hit a soft spot
After excavating to the desired depth, I still have unstable soil to take care of. I install geotextile fabric over this area. The geotextile helps to spread the weight of the ensuing stone base, creating a stable surface.

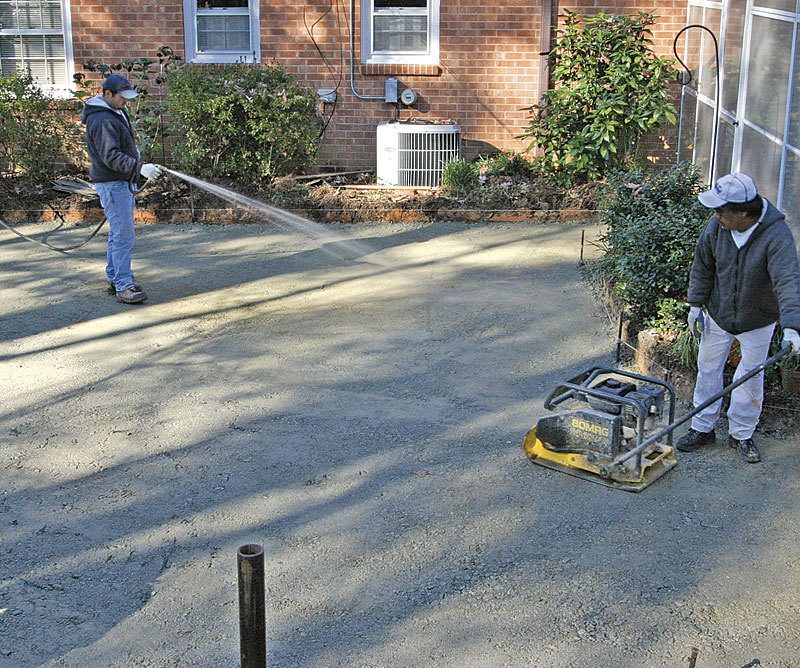
Spread the stone in thin layers
The ABC stone we used for the base includes all gradations of stone from dust to 1-1/2-in.-dia. gravel. This mix can be packed flat and dense without losing its drainage properties. Apply the base in several 2-in. to 3-in. layers, wetting it down to aid compaction. Repeat the layering process until the base is 3 in. from the finished elevation.
How much will it cost?
Labor, the size and shape of the patio, and the amount of site work required all affect cost. Material and equipment-rental costs differ, too, but not as much.
- ABC stone (stone that includes all gradations from dust up to 11⁄2-in.-dia. size) costs $14 to $15 per ton delivered. Clean, coarse sand costs $15 to $20 per ton delivered.
- Concrete pavers cost between $1.50 and $5.50 per sq. ft.
- The total cost of materials (stone, sand, pavers, and edging) begins around $5.50 per sq. ft. and goes up from there, depending primarily on the pavers and edging that you choose.
- Here in North Carolina, a plate compactor rents for about $75 per day. Cutoff saws with diamond blades rent for about $90 per day, and a basic Bobcat rents for $300 per day.
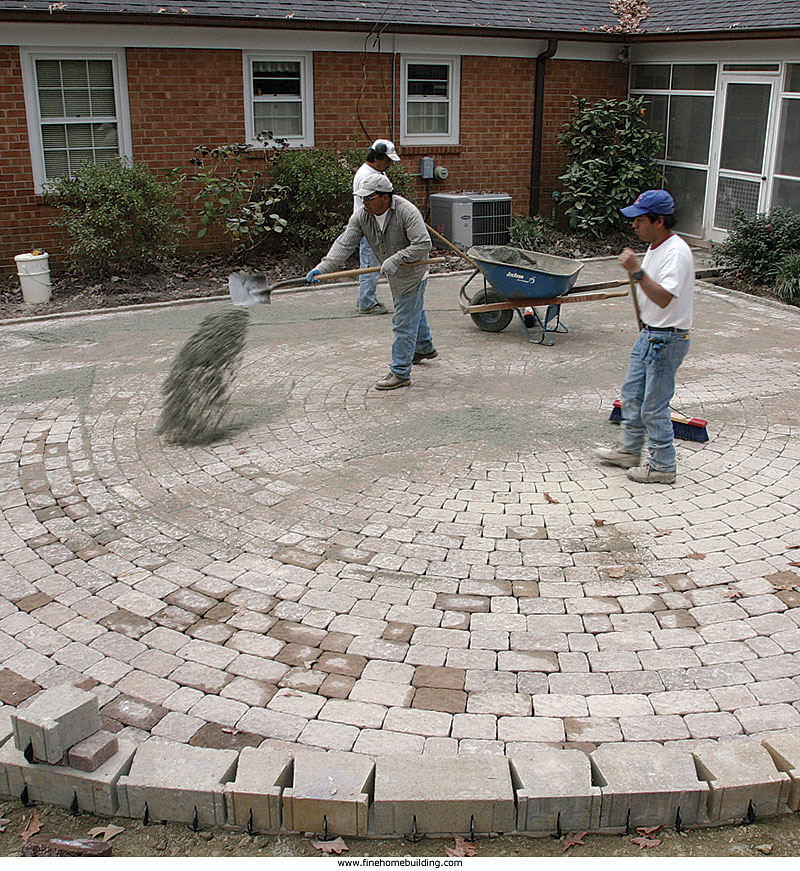
Use coarse sand for bedding the pavers
A maximum of 1 in. of clean, coarse sand is installed on top of the stone base. Initially, I bring in a little more sand than I need. After running the plate compactor, I’ll end up close to my target elevation, but I don’t worry about perfection at this stage. Perfection comes with the final screeding.
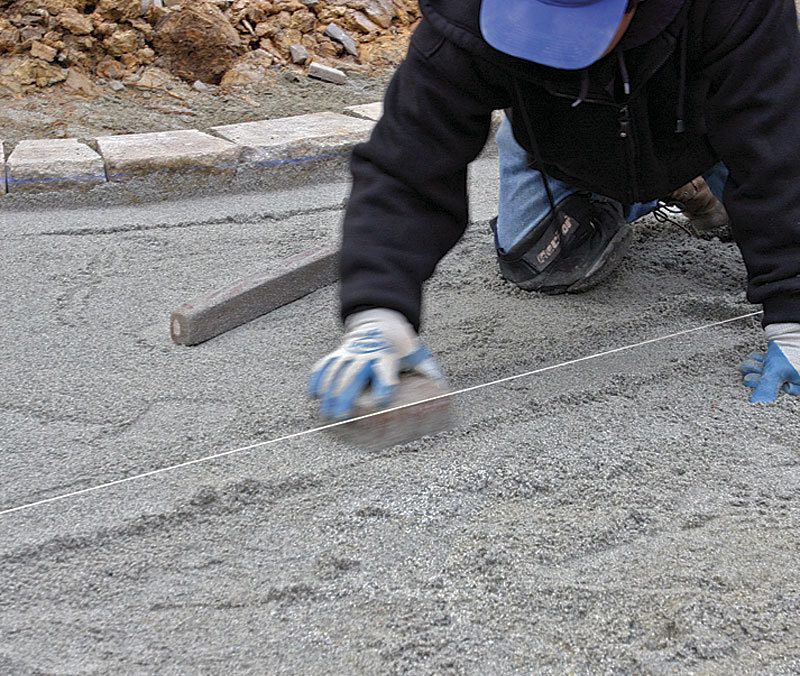
Fine-tune the setting-bed layer
After spreading and compacting the coarse sand over the base, I extend stringlines from the grade pins to identify the finished height of the patio. Then we use a paver and a 4-ft. level (or other straightedge) to fine-tune the setting bed. The final smoothing fluffs the sand a little after compaction so that the pavers bed nicely in the
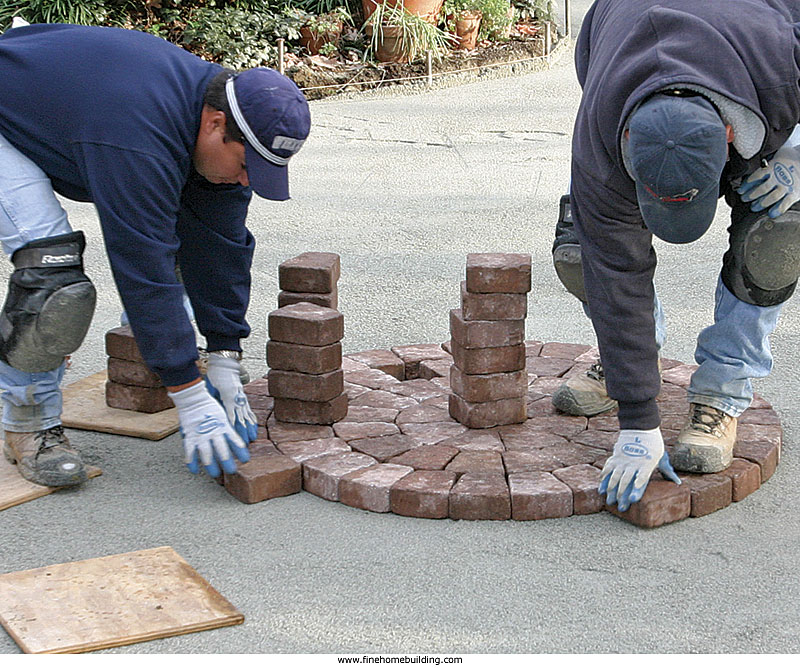
Circular pattern starts with a kit
We chose a circular pattern for this patio because it complements the curve in the retaining wall. These pavers came from Belgard (Oldcastle Architectural Product Group; 800-899-8455; belgard.biz), so we bought their starter kit for circular pavers. The kit includes a couple of sizes of wedge-shaped pieces, which can be used in various combinations to create the first dozen or so rings. After that, the square and rectangular pavers continue the pattern. Like most paver manufacturers, Belgard provides a good installation guide for anyone unfamiliar with the process.
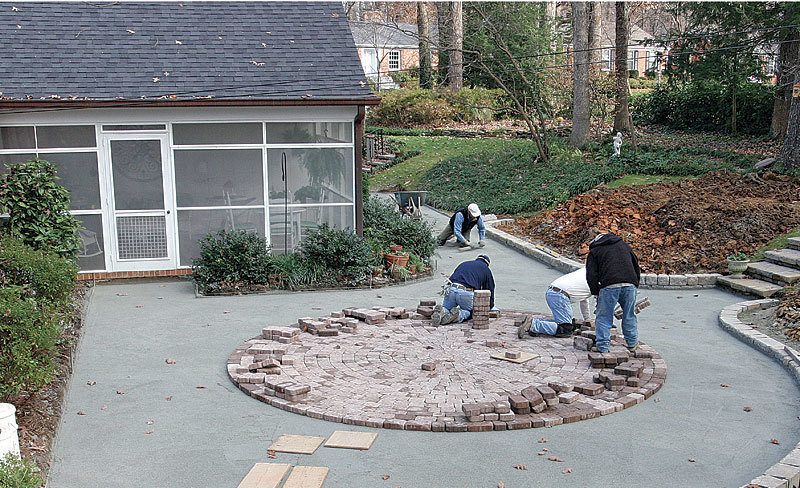
Start in the center
Where’s the center? Matching the paver pattern to the retaining wall would have placed the pat tern’s center too close to the house, so we started closer to the center of the patio. When installing pavers in running rows, we’re careful not to line up the joints.
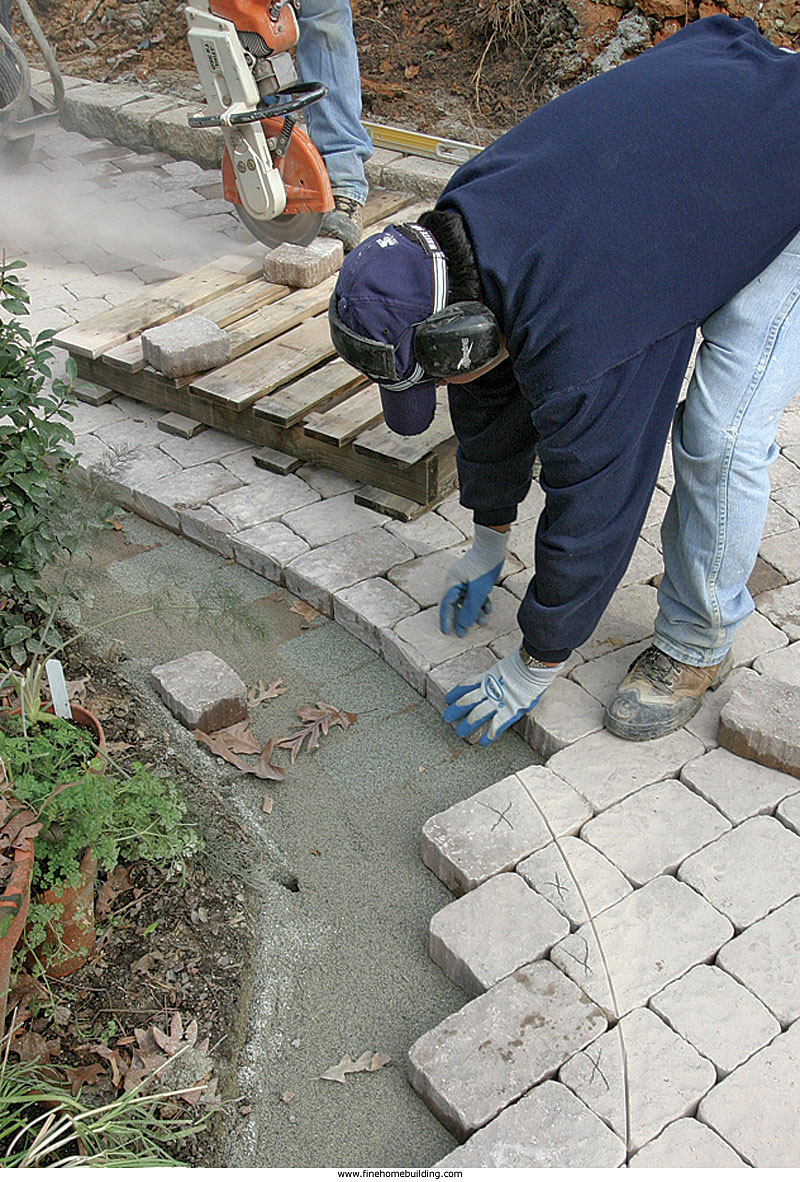
Make straight cuts in place
Straight runs are easy. Snap a chalkline, then use a cutoff saw with a diamond blade to make a quick scoring cut along the top of the paver. Make a final pass, cutting through the pavers and slightly into the sand.
Cutting curves is trickier
Mark curves with 3/4-in. braided rope, which bends and holds a curve. When the curve is formed, mark it with a pencil, and score it lightly with the saw to make a smooth curve. Take each piece out and complete the cut.
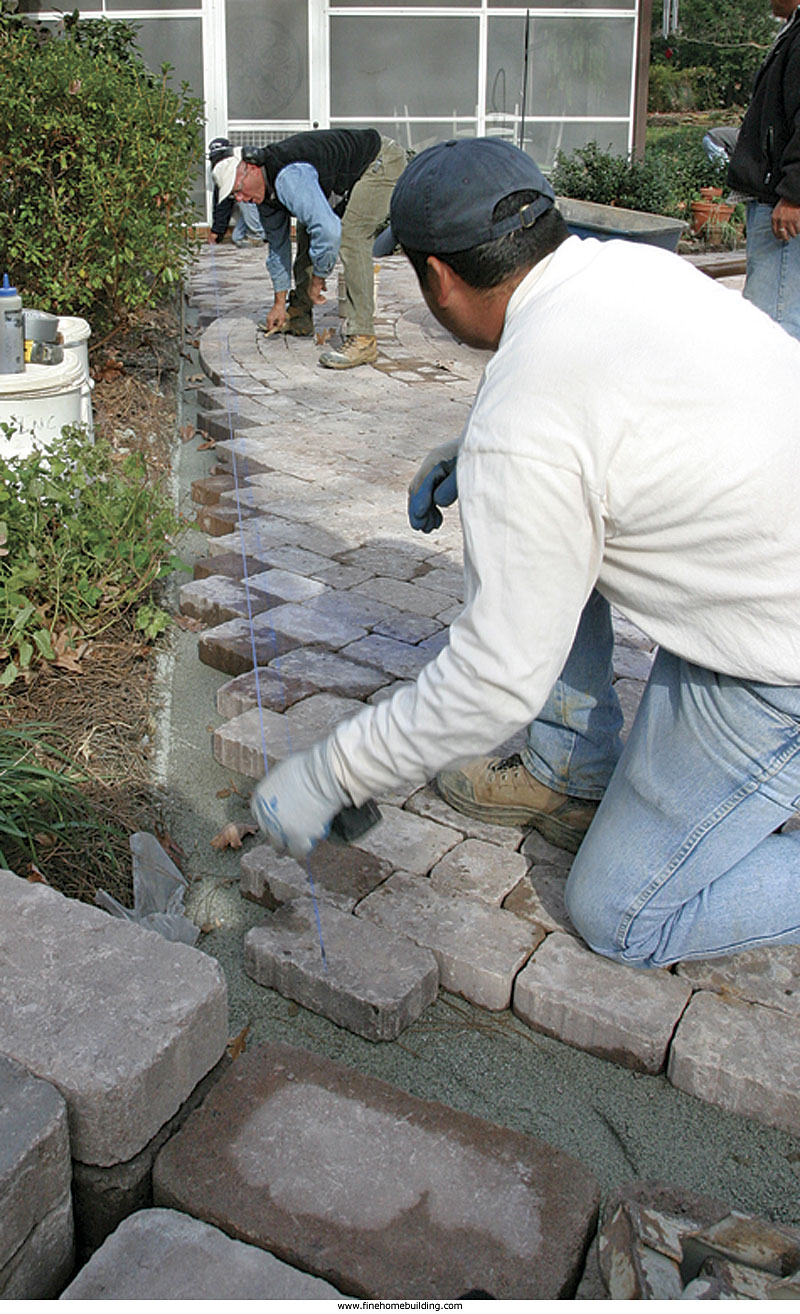
Anchor pavers around the edges
On this job , we used a masonry border (from Belgard) with plastic inserts that poke into the pavers and then are spiked into the ground. My favorite edge restraints are the 8-ft. polyethylene strips, which can form curves if you snip the intermediate tabs.

Lock the pavers into place
Sweep sand into the cracks. We spread clean, coarse sand over the patio and sweep it into the cracks . Then we vibrate the pavers with a compactor to lock the pavers into place. We repeat the process at least one more time: spread, sweep, and vibrate.
Dick Henry is a contractor who lives and works in Chapel Hill, N.C. Photos by Chris Green, except where noted.
To read the entire article, please click the View PDF button below.
From Fine Homebuilding #170
Fine Homebuilding Recommended Products
Fine Homebuilding receives a commission for items purchased through links on this site, including Amazon Associates and other affiliate advertising programs.

Drill Driver/Impact Driver

MicroFoam Nitrile Coated Work Gloves
FastenMaster Screw Bolt Fastening System